Key takeaways
- The evacuation diagram has to show the assembly point, the route to it, and the location of the services you may need to isolate, because on a small site the crew will not remember a verbal description under pressure.
- The site plan must be redrawn when the job changes — frame stage, lock-up, and fit-out all have different escape routes because the structure itself has changed.
- A crew briefing only counts if the subbie can point to the assembly point from where they are standing, so brief at the location rather than in the site shed.
- Emergency planning on a house site is a principal contractor duty that sits alongside induction, and the two documents should reference each other rather than duplicate each other.
- The most expensive failure is not the missing plan; it is the plan the crew has never seen, because the regulator and the insurer both ask what the workers on site actually knew.
Emergency planning on a house site gets treated as a paperwork exercise because the site is small and the crew is familiar. That is exactly when it fails. A house site has one narrow access, a temporary switchboard, a stack of frame timber, and a rotating cast of subbies who have been on the job for a day and know nothing about the layout beyond the room they are working in.
The plan itself is not complicated. What matters is the site plan posted where people can see it, and the briefing that puts the plan in their heads. Get those two right and the rest of the emergency arrangements follow. Get them wrong and you find out at the worst possible moment, with a subbie standing at the wrong end of the block and no idea where to go.
This article covers the site plan and the crew briefing only. First aid equipment and incident notification are separate obligations and are covered elsewhere.
Why a house site is not the same as a commercial site
On a commercial project, the emergency arrangements are usually designed into the job before the first excavator arrives. There is a site office, a marked assembly area, a warden structure, and a documented procedure that has been through a review. On a house site, the principal contractor is often the builder, the supervisor is often the only person on site full time, and the workforce changes weekly.
That shape of job produces a specific risk. The people on site at any moment are the least likely to know the layout. A tiler arrives on Monday, a plasterer on Tuesday, an electrician on Wednesday. Each one gets a quick wave at the front and starts work. If the fire alarm goes off, or the switchboard starts arcing, or someone yells that a cylinder is leaking, none of them know where to walk.
The planning obligation sits with the principal contractor, and on a house site that is usually you. The obligation is not satisfied by having a document in a folder. It is satisfied when the people on site know what to do and where to go.
The other thing that makes house sites different is that the structure itself changes the escape routes. At frame stage, you can walk out through any wall. At lock-up, the doors are in and the windows are in, and your route out depends on which openings are still accessible. At fit-out, the internal walls are up and the site is a maze of rooms. A plan drawn once at the start of the job is wrong by the time the plasterers arrive.
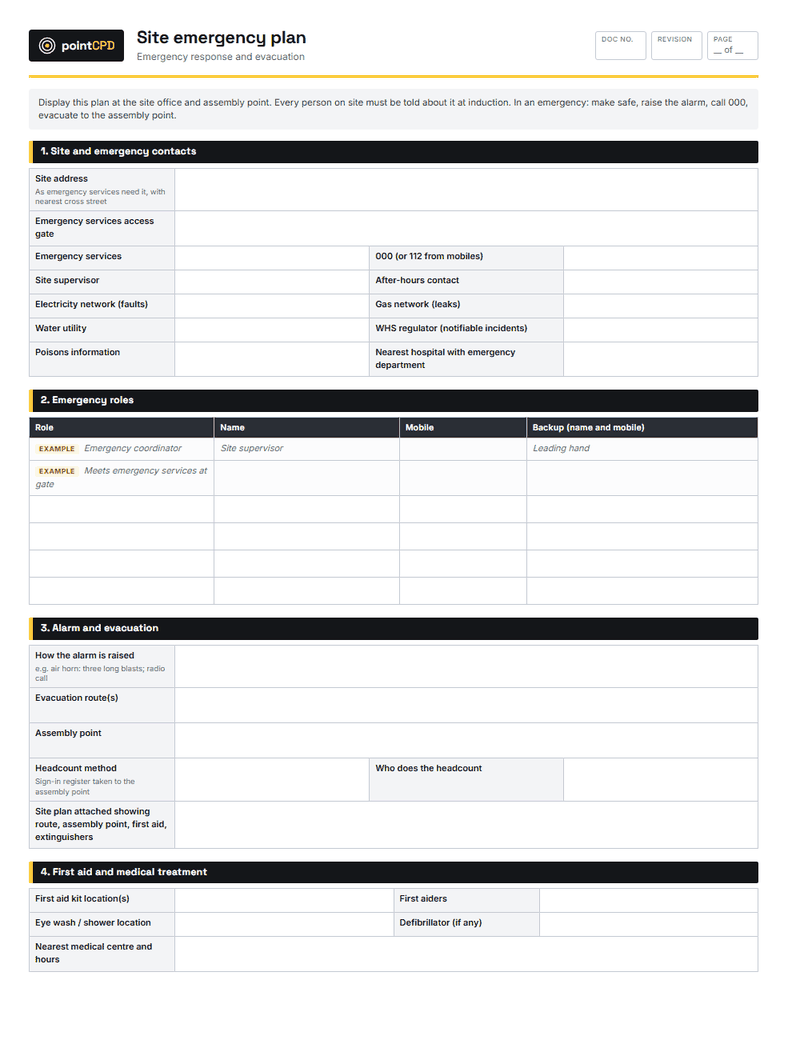
What the site plan has to show and why each item is there
The plan is a diagram, not a document. It sits on a wall or a noticeboard near the entry, laminated or in a plastic sleeve, and it is readable from standing height. Every item on it exists because someone needs to find that thing under pressure.
The assembly point is the first item. It needs to be a place that is reachable from every part of the site, clear of the structure, clear of the access route for emergency services, and identifiable on the ground. If it is the front nature strip, mark it. If it is the footpath outside the neighbouring property, mark it. Do not rely on the crew to infer it.
The escape route is the second item. On a house site there is usually one obvious route and one less obvious one. Show both. If the obvious route passes a temporary switchboard or a gas cylinder, show the alternative.
The services are the third item. You need to know where the main switchboard is, where the temporary supply is isolated, where the gas cylinder or meter sits, and where the water main is. If there is a fire or a flood, someone will need to isolate one of those, and they will not have time to work it out.
The access point for emergency services is the fourth item. On a house site, the front gate may be locked, the driveway may have a skip on it, and the nearest cross street may be the only way a fire truck can approach. Mark the access point and note any gate that needs to be opened.
The contacts are the fifth item. The site address, the supervisor’s number, the principal contractor’s number, and any after-hours contact. If a subbie is the last person on site and something happens, they need a number that answers.
Finally, the plan should state the stage of construction it applies to and the date it was drawn. That is how you know when it is out of date.
Building the site emergency plan
- 1Walk the siteWalk the site at the start of the job and identify the assembly point, the escape routes, and the services that may need isolating.
- 2Draw the planDraw the plan to suit the actual site, showing the assembly point, the route to it, and the location of the main switchboard, gas, and water.
- 3Set the triggerWrite down what triggers an evacuation, who calls it, and who checks the site is clear.
- 4Brief the crewBrief every worker and subbie at the assembly point itself, not in the site shed.
- 5Review at each stageRedraw the plan at frame, lock-up, and fit-out, because the structure changes the escape routes.
- 6Re-brief new arrivalsRe-brief every new subbie at induction and record that the briefing happened.
Choosing an assembly point that actually works
The assembly point is where the plan either works or falls apart. The common mistake is to nominate the front of the site because it is convenient to describe. That is fine until the front of the site is where the hazard is, or where the emergency services need to park, or where the excavation is.
A workable assembly point has four characteristics. It is clear of the structure, so falling debris is not a concern. It is clear of the access route, so it does not block the fire truck. It is reachable from every part of the site without passing the hazard. And it is identifiable on the ground, so a subbie who has never been briefed can find it from a verbal description.
On a tight inner-city block, the assembly point may be the footpath outside the neighbouring property in one direction. On a large greenfield block, it may be the far corner of the site, away from the structure and the driveway. On a battle-axe block, it may be the street frontage at the end of the access handle. There is no single answer. The answer is whatever works for that site, and it needs to be marked.
If the assembly point changes during the job — because the driveway is being poured, or because a crane is being used — the plan changes and the crew is re-briefed. Do not assume people will work it out.
Isolation points: the part most plans miss
Most house site emergency plans show the assembly point and the escape route, and stop there. That is half a plan. The other half is the services you may need to isolate.
The main switchboard is the obvious one. On a house site it is often a temporary board on a pole near the front of the site, and it may be the source of the emergency rather than the thing that fixes it. If the board is arcing or smoking, the isolation point is upstream of it, not at it. That means the point where the supply enters the site, and it needs to be marked.
Gas is the second. If the job has a gas connection, the cylinder or meter needs to be on the plan, along with the shut-off. A leaking cylinder in a confined space is a different problem to a leaking cylinder in the open, and the crew needs to know which one they are dealing with.
Water is the third. If a pipe is broken during excavation or demolition, someone needs to shut it off. The main tap needs to be on the plan.
Electrical safety is a live issue on every house site because of temporary supply, leads across wet ground, and tools that get knocked around. The Safe Work Australia guidance on electrical safety is the reference point for how the supply should be managed, and the site plan is where you record the isolation point that matches it.
What the posted site plan must show
- The assembly point, marked clearly and reachable from every part of the site.
- The escape route from the working areas to the assembly point, including any secondary route.
- The location of the main switchboard and the isolation point for temporary supply.
- The location of the gas cylinder or meter and the water main.
- The site address and the emergency contact numbers for the principal contractor and the supervisor.
- The date the plan was drawn and the stage of construction it applies to.
- The nearest access point for emergency services, including any gate that may be locked.
The crew briefing: what to say and where to say it
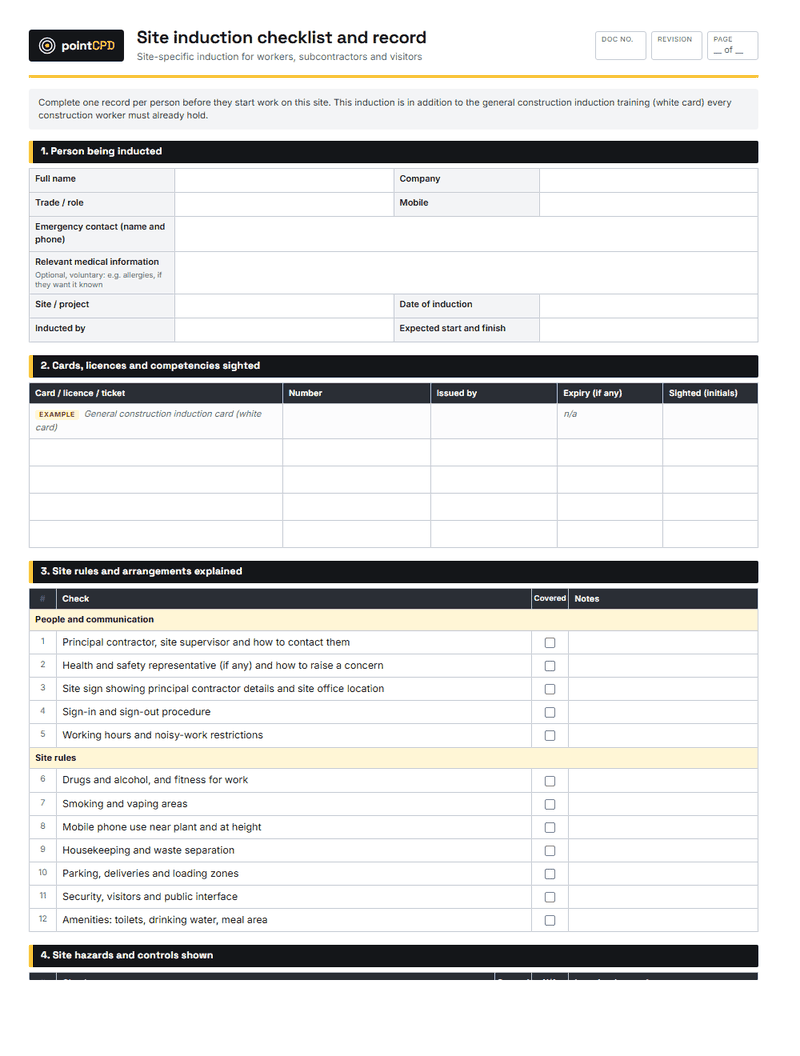
The briefing is the part that turns a plan into behaviour. It happens at induction, and it happens again whenever the plan changes. It is short, and it is done standing up.
The structure that works is a walk. Take the new subbie to the entry, point out the plan on the wall, and then walk them to the assembly point. Stand at the assembly point and point back at the site. Name the escape route. Name the isolation points. Name the person who calls an evacuation. Then walk back and ask them to describe the route in their own words.
That last step is the one that matters. A subbie who can describe the route has learned it. A subbie who nods has not. The test is not whether you said it; the test is whether they can repeat it.
The briefing should cover four things. First, what triggers an evacuation — fire, gas leak, structural collapse, or anything the supervisor calls. Second, who calls it — the supervisor, or the most senior person on site if the supervisor is not there. Third, where to go — the assembly point, by the marked route. Fourth, what to do next — stay at the assembly point, do not re-enter, wait for the roll call.
The roll call is worth a mention in the briefing. On a house site with subbies coming and going, the supervisor needs to know who is on site. A sign-in sheet at the entry is the simplest way to do it, and it doubles as the roll call list. If the sheet is not maintained, the roll call is a guess.
The briefing should also cover the site-specific hazards that affect evacuation. If there is an excavation, the escape route needs to avoid it. If there is a crane, the assembly point needs to be outside the drop zone. If there is a pool under construction, the NSW Government guidance on pools and pool safety is the reference for the barrier and access requirements, and the pool area needs to be considered in the escape route.
Record the briefing. A signed induction form that includes the emergency briefing is the evidence that the briefing happened. The site induction checklist template is the starting point, and it should have a line for the emergency briefing and the walk to the assembly point.
Redrawing the plan as the job progresses
A house site changes shape three times in a typical job, and each change affects the escape routes.
At frame stage, the site is open. The escape routes are wherever you can walk, the risks are falls and falling objects, and the assembly point is usually easy to reach. The plan at this stage is simple.
At lock-up, the structure is closed. The doors and windows are in, the roof is on, and the internal walls may be up. The escape route now depends on which openings are still accessible. If the front door is locked and the back door is blocked by materials, the route out is a window or a garage opening. The plan needs to show it.
At fit-out, the site is a series of rooms. The escape route is a path through the house, and it may be obstructed by materials, tools, and trades working in sequence. The plan needs to show the path and the assembly point, and the briefing needs to be repeated because the route has changed.
There is a fourth change that is easy to miss: the pool. If a pool is being built, the excavation is a hazard, the barrier requirements change as the job progresses, and the pool area may block one of the escape routes. The plan needs to account for it at each stage.
The practical approach is to redraw the plan at each stage change and re-brief the crew. It takes an hour, and it is the difference between a plan that works and a plan that is decoration.
Where the plan sits with the rest of your site documentation
The emergency plan is not a standalone document. It sits alongside the induction, the SWMS, and the site diary, and it should reference them rather than duplicate them.
The induction covers the emergency briefing and the walk to the assembly point. The SWMS covers the high-risk activities that may trigger an emergency. The site diary records the briefings and the plan revisions. The plan itself is the diagram on the wall.
If you are working on a project that requires a fire safety assessment or a development certificate, the Environmental Planning and Assessment (Development Certification and Fire Safety) Regulation 2021 is the instrument that sets out the certification and fire safety requirements for the development. That is separate from your construction site emergency plan, but the two need to be consistent. If the development has a fire safety schedule, the site plan should not contradict it.
If the job is a new dwelling, the BASIX requirements may affect the design and the services, and the BASIX information on the NSW Planning Portal is the reference for what the certificate covers. Again, the site plan needs to be consistent with the services that are actually installed.
For the broader CPD context, the guide to how NSW builder CPD works explains how safety topics fit into your annual hours, and the course catalogue lists the options.
Worked example: a builder in western Sydney
A builder in western Sydney is running a knock-down rebuild on a battle-axe block. The access is a long driveway shared with the front dwelling, and the site itself is at the rear. The builder draws an emergency plan at the start of the job, marks the assembly point at the front of the site near the letterbox, and posts the plan on the hoarding.
At frame stage, the plan works. The crew can walk out through the frame and down the driveway. The assembly point is clear. The briefings are done at induction and the sign-in sheet is maintained.
At lock-up, the front door is installed and the windows are in. The driveway is being used to store materials, and the skip is parked across the width of the access. The builder does not redraw the plan. A subbie arrives to do the cornice, gets the standard induction, and starts work. On the second day, a temporary lead overheats and starts smoking in the hallway. The subbie yells, the crew stops work, and everyone heads for the front of the site. The problem is that the front door is locked, the skip is blocking the driveway, and the only way out is through the garage opening, which nobody has been shown.
Nobody is hurt. The lead is isolated and the smoke clears. But the builder has just discovered that the plan has been wrong for three weeks, and that the briefing the subbie received did not match the site he was working on.
The fix is straightforward. The builder redraws the plan to show the garage opening as the primary escape route, marks the assembly point at the street frontage because the driveway is obstructed, and re-briefs every subbie on site. He adds a stage review to the programme so the plan is redrawn at frame, lock-up, fit-out, and pool excavation if there is one. He also moves the sign-in sheet to the garage opening so the roll call matches the route people actually use.
The cost of the original mistake was an hour of re-briefing and a redrawn plan. The cost if the smoke had been a fire is a different number entirely, and it would have surfaced in an investigation, an insurance claim, and a conversation with the regulator about what the workers on site actually knew.
What to check before the next pour, frame, or fit-out
The plan is a living document, and the checks are simple. Before each stage change, walk the site and ask four questions. Can a person standing anywhere on the site see or find the assembly point? Is the escape route clear of the hazard and the access route? Are the isolation points marked and reachable? Has every person on site been briefed on the current plan?
If the answer to any of those is no, the plan needs work before the next trade arrives. The site emergency plan template is a starting point for the diagram and the briefing record, and the article on the residential site induction checklist covers how the briefing fits into the induction process.
The broader point is that emergency planning on a house site is not a document. It is a diagram on a wall and a walk to the assembly point. Everything else is administration. If the crew knows where to go and what to do, the plan is doing its job. If they do not, no amount of paperwork will fix it.
For the CPD side, the NSW builder CPD courses on the PointCPD home page cover safety topics like this in more depth, and the related articles on first aid facilities on house sites and incident response and notifiable incidents in NSW cover the parts of the emergency arrangements that sit outside the site plan.
The mistake that costs the most. The plan that exists but has never been briefed is worse than no plan at all, because it creates a record that you thought about the risk without doing anything about it. A subbie who has never walked to the assembly point will not find it under pressure, and the investigation will ask what the workers on site actually knew.
Questions builders ask
Does a house site need a formal emergency evacuation plan?
Yes. As principal contractor you have a duty to plan for emergencies on the site, and a house site is not exempt because it is small or because the crew is familiar. The plan does not need to be elaborate, but it does need to exist, be posted where workers can see it, and be briefed to everyone on site.
What should be on the emergency plan for a residential construction site?
At a minimum, the assembly point, the escape routes to it, the location of the main switchboard and the isolation points for gas and water, the access point for emergency services, the site address, and the contact numbers for the supervisor and the principal contractor. The plan should also state the stage of construction it applies to and the date it was drawn.
How often should the site emergency plan be reviewed?
Review it whenever the site changes shape, which on a house job means at frame stage, lock-up, and fit-out, and again if a pool is being excavated. Also review it if the access changes, if a crane is brought on site, or if the assembly point becomes obstructed. A plan drawn once at the start of the job will be wrong by the time the plasterers arrive.
Do subbies need to be briefed on the emergency plan separately from induction?
The briefing should be part of induction, but it needs to be more than a line on a form. Walk the new subbie to the assembly point, point out the escape route, and ask them to describe it back to you. Record that the briefing happened, and re-brief if the plan changes during the job.
Where should the assembly point be on a house site?
It needs to be clear of the structure, clear of the access route for emergency services, reachable from every part of the site without passing the hazard, and identifiable on the ground. On a tight block it may be the footpath outside the neighbouring property. On a battle-axe block it may be the street frontage at the end of the access handle.
Does the emergency plan need to cover pool construction?
Yes, if the job includes a pool. The excavation is a hazard, the barrier requirements change as the job progresses, and the pool area may block an escape route. The plan needs to account for the pool at each stage, and the NSW Government guidance on pools and pool safety is the reference for the barrier and access requirements.
Sources
- Environmental Planning and Assessment (Development Certification and Fire Safety) Regulation 2021 · NSW Legislation
- BASIX · NSW Planning Portal
- Electrical safety · Safe Work Australia
- Pools and pool safety · NSW Government
Published 17 September 2026. General information for builders, not legal, financial or engineering advice for a specific job. Check current requirements with the relevant regulator or standard before relying on them.